How to shoot panoramas
Published: 09.06.2020

Do you want to reach a new level in landscape photography? Then - read our tips on how to shoot a panorama. We do not advertise wide-angle lenses, which are used to create panoramic images. We will tell you how to take a panoramic photo with a regular digital camera or even a smartphone.
A panoramic photograph, made from multiple shots, is much more impressive than a photo taken with a wide-angle lens. This way, you get much less lens distortion. And the size of the resulting image allows you to make prints of panoramic photos of any size.
What is a panoramic photo?
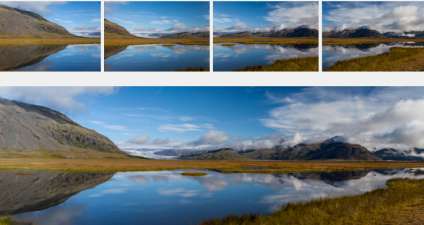
Panoramic photographs are a series of overlapping frames of a scene that are then merged together using special software.
You may argue that this is very long and laborious. And why not just take a photo of the scene with a wide-angle lens right away? This is a good question! That's why we share with you the reasons why you should choose a series of photos instead of just one wide-angle shot:
- A wide-angle lens may not be wide enough (sorry for the tautology). It may simply not capture the entire scene in one go.
- Photos taken with a wide-angle lens demonstrate undesirable lens distortion. The viewer will feel uncomfortable feeling deceived.
- A panoramic image, created from multiple photos, is actually much larger. Therefore, it can be printed in a much larger size.
- Instead of expensive special lenses, you can use standard ones.
Wide-angleA lens with a field of view of over 60 degrees captures a landscape well in one shot. However, the amount of distortion it produces suggests that it is not the best choice for panoramic shots.
Узкоугольные" translates to "wide-angle" in English.Or telephoto lenses with a field of view less than 40 degrees will be suitable for panoramic shots only if you are trying to make a panorama from a distance. Not all telephoto lenses are capable of being used for this type of photography. Therefore, we will consider it not entirely suitable for shooting panoramas.
StandardA lens with a field of view of 40-60 degrees is ideal for shooting panoramic photos. The lens distortion is minimal, resulting in more realistic panoramic images.
- No tripod - no way! You can read a lot of posts and articles about how you can do without a tripod. And in general - this device is a relic of the past. But! When you use a tripod, the photos are aligned at least along one axis. Then, during photo merging in a program, you will have fewer losses. Agree that this is a strong argument.
- Shoot in RAW. The best results can be achieved in this format, not JPEG. RAW images are the digital equivalent of film camera negatives. Unlike JPEG, images are not compressed and no settings are applied to them. Sharpness is not increased, color saturation is not changed, etc.
RAW opens up more possibilities for post-processing. In addition, great photo editing programs like Lightroom can easily merge a series of RAW shots into a panorama, just as easily as in JPEG format. - Test shot. Take a test shot in aperture priority mode. Switch to this mode. Set the aperture to f/11. Take a test shot of the brightest part of the scene.
Make sure that the test frame has sufficient sharpness in the foreground and background. If not, increase the aperture value, for example, to f/16, and try again.
Check to make sure there are no blown highlights in the test image. That is, very bright white areas. Some cameras show highlights, causing them to flicker on the camera screen.
Reduce the amount of light entering the camera sensor by half by increasing the exposure time or setting the exposure compensation to -1.
Create a Light album from cool photos. You don't need to print the photos separately. We will print your photos directly on the pages of the Light album. Upload images to the free editor Mapi7 and create a themed Light album. You can upload photos from your phone.
If you liked the test shot, make a note of the aperture and shutter speed settings. They will be useful in the next stage.
- Manual mode. To achieve the perfect panorama, the exposure must be consistent for each photo. This means that the aperture size, shutter speed, and ISO should remain constant.
The same brightness of the images will result in a seamless final panorama. - Set the focal distance. It is important for the focal distance to remain the same for each frame. This will eliminate fluctuations in the sharpness of scene elements.
To keep the focal length consistent between shots, switch to manual focus mode. - Shoot vertically. For horizontal panoramic shots, take photos with a vertically positioned camera. This provides more options for software during merging photos. Yes, you will have to take more shots than if your camera was positioned horizontally. But believe me, it's worth it) And it doesn't matter where you start shooting from: right to left or vice versa.
- Overlap the frames by 1/3. Programs in which you will be combining images love generous overlay of images on top of each other. Do not hesitate to use multiple frames. Aim to overlap the previous image by about one third.
But you should know that for all programs, there are rules that must be followed:
- Before merging in a photograph, no changes can be made. This can lead to visual inconsistencies in color and exposure.
- avoid cropping images. Photos should have the same width and height (in pixels).
Capturing landscapes in the finest details is very interesting. And the high resolution of the images obtained means that such work can be printed in very large sizes and hung on the wall.
Today you can print photos online. Mapi7 offers to print your panoramic images in sizes up to 30x90.
Cool photos deserve unique framing. Print your cool photos in a Polaroid style. Fans of instant photography from the 90s may experience familiar feelings when holding a Polaroid-style photo in their hands. Those who are not familiar with traditional Polaroids will appreciate the square images with space for captions.
Don't wait until you find the perfect scene. There are plenty of places in the city that are worth paying attention to.Urban landscape photographyopens up unlimited possibilities for panoramas. Practice the techniques from our article and take panoramic photos anywhere you like.


